


Floral Crochet Bandana Pattern
- Galeb - Hecho a Mano

- Sep 4
- 4 min read
Updated: 1 day ago


Hello everyone! It's been a while, right? It's about time to revive this blog!
I finally gave in to social and fashionista pressure to create a bandana pattern.
When I searched for inspiration—and I searched quite a bit—I first settled on a much simpler idea: a chain stitch decorated with flowers, or any other element you'd like to incorporate. But in the end, the temptation was greater. I'd saved the pattern for these little flowers on Pinterest for a long time, and seeing how the original designer combined it and transformed it into a top, I imagined it as a bandana.
I wanted something very feminine but also vibrant. The flower petals gave me the effect I was looking for, and after making the first one, I decided to make the full headband. Here's the step-by-step pattern.
The flower itself is very easy; we're talking beginner-level crochet. Obviously, it has its tricks, which I'll tell you about now. But I wanted to explain a little about the structure before jumping right into the pattern.
I started at the base of the triangle. I knitted the first row, and from there I hooked the rest until I reached the tip of my triangle.
But it's versatile and very versatile. You can actually start with the flower at the tip, and you'll measure how big you want it to be. For my part, I made the first flower, measured it, and then figured out how many beads I wanted to make.
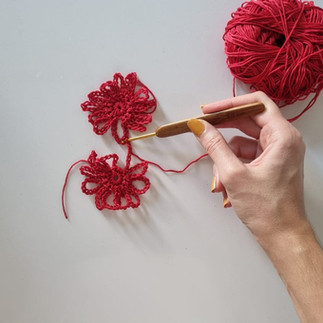
I used 3 mm hook with the yarn called Alterego from Adriafil color 053 - 100% cotton.
We start with a magic ring, making 12 single crochet stitches inside the ring. We close with a slip stitch.
From the slip stitch, we crochet 13 chains and hook them with a slip stitch to the next stitch under the ring (the 12 that we crocheted in the previous row)
We continue like this until we have 12 petals. We close with a slip stitch in the first stitch where we started.


Below is the step-by-step with photos:


Once the first flower is made, the rest are crochet the same way, except that you have to hook them strategically to form the triangle (bandana).
Below, find the photo of the final bandana and some references above some flowers. Use these references to crochet them and form our triangle.

We crochet the first flower following the steps above; the first flower is on the top left.
All the flowers at the base of the triangle are crochet the same - indicated as A.
Flower A:
We crochet the first 10 petals normally. We knit petals 11 and 12 like this: chain 6, insert the needle into the middle of a petal from the previous flower, slip stitch the two flowers together, and continue chaining 6 more. We finish off with a slip stitch. Repeat for petal 12. See photos below:


Flower B: We crochet 8 petals normally, and we crochet the last 4 by joining them to the top-left and top-right flowers (Flower A in the first row). See the diagram for a better understanding. Joining the petals follows the same explanation as for Flower A.
Flowers C: We normally weave 6 petals and the other 6 we do it by joining them with the flowers on the left, top-left and top-right.
Once we have the bandana size we'd like, in my case, the base row (flowers A) is 55 cm long, which is enough to cover my entire head up to my ears. See photos below.
I always recommend finishing the bandana with 1 flower just at the tip, so adjust the width in the first row (flowers A) according to the size of your head.
As you can see in the photo, I made a total of 6 base flowers, decreasing 1 flower at a time, weaving between 2 from the previous row until reaching the flower at the tip.
Finally, we need to weave the cord to tie our bandana. In my case, I wanted to be able to wear it on my head but also around my waist. So, I measured my waist and checked how much I really needed to tie it comfortably. My cord, including the bandana of course, measures 1 meter.
Cord: I chained 55 stitches, and slipped into the 4th petal of the top right flower. I followed the sequence in the chart below for all the flowers on the base of my headband.
55 chain stitches - slip stitch 1st petal - 2 chain stitches - slip stitch 2nd petal - 3 chain stitches - slip stitch 3rd petal - 2 chain stitches - slip stitch 4th petal - 4 chain stitches between each flower. I continue this sequence until I have completed all the petals on my base flowers. Finally, I chain 55 more on the other side.

Once I'd worked all the base chains and had a total length of 1 meter, I went back and simply single crocheted in each chain from the previous row. Cast off.
You're done!!!! :)


All crochet designs, patterns, and photographs published on this blog are my original work unless otherwise stated. Commercial use, reproduction, or distribution without permission is strictly prohibited. © 2025 Galeb by Dai.

Comments